An Introduction to Aqfer Universal Tag
If you navigate to Aqfer’s product documentation, you’ll see the following describing aUT.
“The aqfer Universal Tag (aUT) provides the ability to actively and intelligently collect and identify data from digital channels while ensuring compliance with data protection obligations. aUT allows you to orchestrate digital channels with data collection capabilities, identity generation and association, privacy governance, and containers for managing the invocation of partner and ancillary tags.
aUT API calls are invoked by embedding an image or script fragment (a.k.a., a “tag”) into an HTML web page or making an HTTP GET request for a specific object from an aUT Collector, which is an HTTP edge-deployed server on the Akamai Content Delivery Network (“CDN”). The aUT API supports a variety of different tag types, each of which supports a specific combination of behaviors. Some capabilities include:
-
-
- setting and confirming client-persisted unique identifiers such as cookies via HTTP header,
- calculating statistical identifiers for user agents, collecting data about the context in which the tag is invoked,
- recording parameters passed in the query string section of the URL for an HTTP GET request,
- passing information between various services through HTTP requests,
- intelligent management of the insertion of partner tags.
-
The aUT tag also provides a Javascript data layer that facilitates the collection of data from other web page data or code.”
Of course, the description is accurate, but this article is designed to move beyond that. In this guide, we’ll dive deeper into the practical applications of creating, managing, and deploying tags in privacy-compliant and durable ways. Buckle up as this is a lengthy piece, but if you want to skip ahead to another section, here are some helpful links:
Examining Your Toolkit
Essentially, you should think of aUT as a toolkit to build and manage the tags you need. Whether for tracking impressions and placements in your display ads, viewer engagement and time spent watching your videos, or setting cookies for your own site’s anonymous tracking, aUT has solutions for your data collection needs.
Let’s start with a few basics about some of the most common tag types.
Atomic Tags
An atomic tag is a tag that only results in a single HTTP request at a time. That means it’s only doing one thing at a time, be it setting a single cookie, collecting a specific piece of data, or completing a single redirect to a destination URL. These tag types may be used on their own in paid media or email tracking, or delivered via a container tag – either an Aqfer-provisioned container tag or via other third-party tag managers such as Google Tag Manager.

Although there are other atomic tag types available for special situations, the five most common atomic tag types are “a.gif”, “c.gif”, “s.js”, “cs.js” and “r”.
As you can likely infer, a.gif and c.gif are image tags, also known as pixels, that serve a transparent 1×1 image. A simple way to tell which one to use is to know that c.gif sets a cookie if a unique cookie does not exist, whereas a.gif does not.
Similarly, s.js and cs.js are tags that have basic logging JavaScript with statistical ID logic, and they also retrieve JavaScript which calls another tag type. The difference between these two involves whether or not the tag is setting the cookie, which happens with the cs.js tag and not with the s.js tag type.
An r tag type is a redirect to another URL that is passed in the query string. You’ve likely seen these in your own web browsing where you’ll click a link such as myexample.com/my-landing-page?parameter=a_bunch_of_code_and_random_numbers. The information that you see after the question mark is that URL is what is known as the query string. It may look like a bunch of random characters, but it all has meaning and is associated with tracking what is happening with that particular user being redirected to the final URL.
Partner Tags
Partner tags are special tag types designed to assign your data partners to receive information when the tag fires. These are typically configured with special macro functions that can pass along unique IDs, cookie values, or translations of one attribute value to another for data-syncing purposes. Example use cases can include syncing cookies or other identifiers with an identity partner and sending that data into your identity graph to stitch together the user’s activity across sessions.
Container Tags
A container tag is a type of tag that contains multiple other tags and controls when and how they are inserted into the web page. Atomic tags and partner tags may be included within the container, although partner tags are typically injected into an embedded iframe on the page. Aqfer container tag types include “t.dhj”, “tc.dhj”, “ts.dhj”, and “tcs.dhj”, with the differences being whether or not the container sets a cookie, statistical IDs, both, or none. No need to get lost in the minutiae of those for now, as they will all function similarly in that they can be deployed on a website or app one time and then other tags can be orchestrated in the background without ever having to redeploy the code to the website.
Statistical IDs and Cookies
A Statistical ID is a unique identifier assigned to a user or a device, which is used to track and analyze user behavior across different platforms and channels. The term “statistical” refers to the fact that these IDs are derived from statistical data about the user’s device or browser, rather than personal information. However, although this sounds similar to a cookie, it is important to note that cookies and statistical IDs serve different purposes.
A cookie is a small piece of data stored on a user’s device by the web browser while browsing a website. Cookies are designed to be a reliable mechanism for websites to remember relevant information or to record the user’s browsing activity. On the other hand, a Statistical ID is a unique identifier that is generated based on various non-identifiable data points, such as device type, browser type, IP address, and other similar information.
Statistical IDs can be generated in the “back end” to associate multiple events from the same browser and device, even when a persistent cookie is not available, and can also be used to connect events from different domains. This makes them particularly useful in today’s multi-device digital environment. With the upcoming deprecation of third-party cookies in Chrome, the use of Statistical IDs can provide a viable alternative for tying together various digital interactions by inferring a statistical probability that the events are occurring on the same browser and device. They allow for the tracking of user behavior in a privacy-compliant manner across different platforms and devices without relying on third-party cookies, making them a more future-proof solution for digital tracking and data collection.
Configuring Your Host
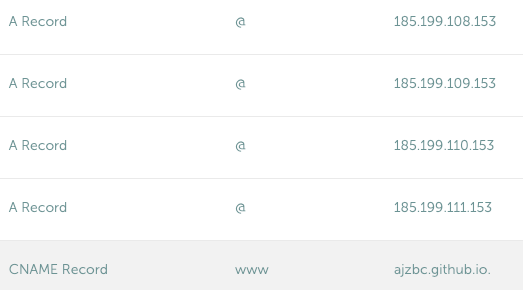
Aqfer Universal Tag relies on tags delivered via HTTP (and/or HTTPS). As such, you’ll need to configure a dedicated domain or subdomain to serve your tags. This is a critical step when trying to deploy tags in a first-party context, and your Aqfer implementation team can help you with our advanced DNS configuration techniques. When properly configured, Aqfer clients see their tags continue to persist on Safari, even after their latest ITP 16.4 release (the most current release as of the time of this writing). Aqfer seeks to serve as an extension of the brand’s technology stack, and not as a third-party who seeks to use the data collected for their own purposes.
Tags created in aUT run on Akamai, one of the most secure and reliable CDNs available. If your website is using another CDN such as Amazon CloudFront, Cloudflare, or Fastly, our team can help you configure your host as needed.
Click here to learn more about how to configure your Akamai DNS.
Image Source: Stack Overflow
Creating Your Tags
You can create and modify your tags in the Aqfer Portal. Inside the Portal, you’ll find a public tag library where you can select common tags created by other users, along with a wizard to help you build your own tag by inputting what you’re trying to capture with the tag. As you create these tags, it’s important to note that you’ll need to create a tag for each type of event you are trying to track. To do so, simply select whether you are trying to track an impression, click, or other engagement such as a video start event, a video third-quartile view event, or even a video being muted. To learn more about how to create tags, check out these videos or click here to launch a step-by-step tutorial.
Universal Tag Portal Demo
Tag Templates and Library Demo
Getting the Right Tags in the Right Places
There are a few best practices to keep in mind when you’re creating a deploying tags, and it all has to do with what you are ultimately trying to accomplish. Using Aqfer Universal Tag should be an easy-to-use solution after all, but it makes sense to know when to use each tool to accomplish a specific job. Let’s look at a few different scenarios:
Owned Media
When deploying tags on your own websites or apps, container tags often make the most sense. Think about it, you’ll likely want to capture lots of different types of events such as clicks, video plays, shopping cart interactions, and a host of other things. You wouldn’t want to have to navigate to every page of the website to redeploy the code every time you make a change, nor would you want to have to maintain each and every script to run on each and every page. Not to mention, you’ll likely have other scripts that you need to control on the page such as Google Analytics, and common conversion trackers from advertising networks like Google, Facebook, or LinkedIn. The container tag is your key to success for deploying tags across your owned websites and applications.
On a side note, if you’re already using another third-party tag management system such as Google Tag Manager (GTM), you can deploy Aqfer-generated container tags there without any side effects. The aUT container tag is designed to be compatible with all major tag management systems, including GTM. While it’s true that this creates a situation where one container tag (aUT) is being called from within another container tag (GTM), this is not a problem. The aUT container tag will still function as expected, managing and firing its own set of tags according to its rules and conditions. However, it’s important to ensure that the implementation is done correctly to avoid any potential conflicts or issues.
Paid Media (Static Display)
For click-tracking in static display ads (aka simple banner ads), a redirect tag is typically the best way to go. Whether included in a tracking template as in Google Ads or used as the final destination URL, these redirects still allow you to capture information about the click to know where it was coming from by setting up your desired parameters within the query string. Impressions can be tracked using a c.gif as described in the next section.
Paid Media (Rich Media and Video)
Rich media ads (the kinds that offer interactivity such as animation, video, and more) allow more options than their static counterparts. Given that these ad types can make HTTP calls and therefore have cookies set, a c.gif tag is often the right approach. These tags can be embedded within the creative itself (i.e. embedded in the HTML file folder that is included in the HTML5 .zip file that is uploaded to the ad server), or they can often be “wrapped” around the creative if your DSP offers that functionality.
Sample Rich Media Ad
Email Tracking
Many leading email marketing automation companies such as Pardot, HubSpot, MailChimp, and others already include email tracking as a standard feature to be able to tell how many people have opened your emails, when they were opened, and how many times they were opened. Ever wonder how they do it? A simple 1×1 transparent image tag is often the answer. At Aqfer, we call these an a.gif tag type. Because we are not trying to set a cookie in the email itself, we can use the a.gif instead of the c.gif to help improve email deliverability and not end up in the spam folder.
Using tags in emails can get a little more nuanced, however. Sure, we can get information about the opens from our a.gif tag, and that’s important, but marketers would also want to know when users are taking action, too. We accomplish this by using a redirect tag for click tracking. Simply insert your redirect tag URL in place of the destination URL on your standard email links and you can take advantage of these benefits. For any marketer who has ever appended UTM parameters to your digital marketing efforts, using these redirect tags will feel like second nature.
Owned Media via Direct Website Placement
When deploying a Aqfer container tag, you’ll see a few short lines of code in the Aqfer Portal along with a button to “Copy Minified Code”. Simply click that button (or copy the full script), and navigate to your website’s admin area. You’ll want to paste the code into the top of the <body> section for every page. If you’re using a CMS such as WordPress, there are a number of plugins that can help you accomplish this, or contact your website administrator for assistance. Click here for a tutorial on how to add a container tag to WordPress.
Owned Media via Third-Party Tag Managers
In some situations, it may be more practical to use an existing tag manager to handle the deployment in lieu of directly adding the code to a website (or series of websites). This may happen if the target website already has a tag management service with lots of other tags in place. Not to worry, the aUT container tag is designed to be compatible with all major tag management systems including Google Tag Manager. If deploying a container tag via a third-party tag manager, it’s important to note that the aUT container will still manage its firing triggers according to its own rules and conditions independent of what is set in the third-party tag manager. Therefore, it’s important to ensure that the implementation is done correctly to avoid any potential conflicts or issues. Click here for a tutorial on how to add an Aqfer tag to Google Tag Manager.
Paid Media – Display Campaigns – Google Ads
Deploying an Aqfer-generated tag inside a Google Ads Display campaign is fairly straightforward. For these campaigns, you’ll want to create a redirect tag in the Aqfer portal that captures all of the parameters you’re looking for, which will likely include impressions, creative IDs, campaign IDs, publisher IDs, publisher domains, and so forth. These parameters will let you know where your ads were shown for which individual ad creative and as part of which unique campaign. You may also have agency IDs or client IDs as needed.

When deploying in Google Ads, you’ll want to navigate to the Ads & Assets section, and then click on the individual ad you want to track. Remember, these are tracked individually so that you can measure the results at a granular level. Once there, click on the “edit” icon (the pencil), and find the section marked “Ad URL Options”. Here, you can paste the tag URL into the “Tracking Template” field. One important note is that you’ll want to include the parameter “ru=” at the end of the query string to ensure that all other values are captured before the redirect to the landing page URL. Assuming that you have filled out the “Final URL” field above with your landing page URL, you can use “ru={lpurl}” at the end to dynamically insert this ad’s final URL without having to copy it twice. For a walkthrough on how to add an Aqfer redirect tag to Google Ads, click here.
One last note: this kind of tracking is intended for display campaigns, not for search campaigns. With search campaigns, you can add your tracking tags via the landing page itself, which you can reference the how-to in the previous Owned Media sections.
Paid Media – Display and Video 360 (DV360)
Display and Video 360, also known as DV360 for short, is Google’s enterprise platform for managing digital media campaigns, including having features to manage reservations, programmatic, and programmatic guaranteed campaigns across display, video, TV, audio, and other channels all in one place. Formerly known as DoubleClick Big Manager, this enterprise-level DSP is part of the Google Marketing Platform and it’s capabilities extend far beyond that of Google Ads, even though the Google Display Network is used by both. Tracking inside DV360 offers more granularity and nuance, but also becomes much more powerful for brands to glean insights from their data.

Display Ads
In DV360, when tracking static display ads (i.e. PNG or JPG image file types), you’ll want to ensure that you set up two separate tags – one to track the impressions, and another for the click. In practice, you’ll likely want to set up a conversion tracker as well, but since the conversion will happen on a different web page than where the ad appears, you’ll manage that separately (i.e. on your landing pages).
To add the click tracker, simply set up a redirect tag with the event type parameter of “aqet=clk” along with all of the other marcos you want to track, such as creative IDs, campaign IDs, Insertion Order IDs, and so forth. Given that DV360 does not have a macro for an Impression ID, we recommend using the Auction ID in its place. This will enable you to tie the parent event (an impression) to a child event (a click) and stitch together the data accordingly. Once you have your tag created, simply paste it in the Landing Page URL field of the ad itself. Easy peasy when setting up your ads.
Adding the impression tracking tags requires an extra step on the “Creative Details” screen by opening up the “Additional Details” menu. Here, you’ll see a checkbox allowing you to “Append HTML Tracking Tag” which you’ll want to ensure is checked. These tags are delivered via the HTML, but are actually image tags (aka pixels). To append these 1×1 transparent images, the website where the ad is being served must also know where to find the tracking pixel, and for that, we use some very basic HTML formatting.
To place the image tag into HTML format, we’ll need three separate statements: the image source (which is the tag URL), the argument “img=true” to ensure that browsers indeed see this as an image instead of looking for a different kind of HTML response, and the argument style=”display:none”. When wrapping all three of into opening and closing code brackets, you’ll get something like this:
<img src=”https://mytagdomain.com/1/e/c.gif?aqet=imp&pevid=${AUCTION_ID}&src=dv360&ca=${CAMPAIGN_ID}&cr=${CREATIVE_ID}&pub=${PUBLISHER_ID}&si=${UNIVERSAL_SITE_ID}&v0=${EXCHANGE_ID}&v1=${BUNDLE_ID}&v2=${SOURCE_URL}&r=${CACHEBUSTER}&img=true” style=”display:none”>
It seems complex, but in reality is very simple. You’ll use that same formula to track all of your impressions for DV360 display ads with the tags you create in the Aqfer Portal.
Video Ads
Adding tracking to video ads in DV360 is very similar to tracking static display ads, in that you will still want to use one tag for click tracking and another for impression tracking. However, with video ads, you’ll likely want to capture more information about how users interact with your video. Did they mute it, pause it, watch it to 25%, 50%, or full completion? Aqfer’s engagement tag types enable you to answer all of these questions but require a separate tag for each of these unique engagement event types.
To add these engagement tracking tags in DV360, navigate to the “Creative Details” page for your video ad and open the “Serving Properties” section. Here you can paste the tag URLs without having to embed them in HTML scripts as you would with a static display ad. Simply match up the type of event you are trying to track with the associated tag URL generated in the Aqfer Platform. Common implementations may contain ten different tracking tags for video ads to track the Impression, Video Start, First Quartile, Midpoint, Third Quartile, Completion, Mute, Fullscreen, Pause, and Click Tracking. These are all easily managed inside DV360 and the data collected by these tags are useful when running analytics to find out which audiences are more likely to watch the ads, engage with them, and so forth, and thus can be useful in determining which creatives to serve in the future.
To learn more about how to deploy Aqfer-generated tags for video ads in DV360, click here for a tutorial.
Putting It All Together
In this comprehensive guide, we hope you’ve learned valuable insights on how to utilize the Aqfer Universal Tag to effectively track your advertising campaigns. Our goal is to empower you with the knowledge required to create and deploy these tags at an enterprise scale across your ecosystem of clients and domains. If you have questions, need guidance, or face challenges, simply contact your Aqfer representative or reach out to the team for more information and we’ll be happy to help.


